You can turn piles of mixed files into a neat, searchable system without a long, painful migration. This guide shows a practical way to move your office to a digital-first process that keeps originals safe and makes work faster.
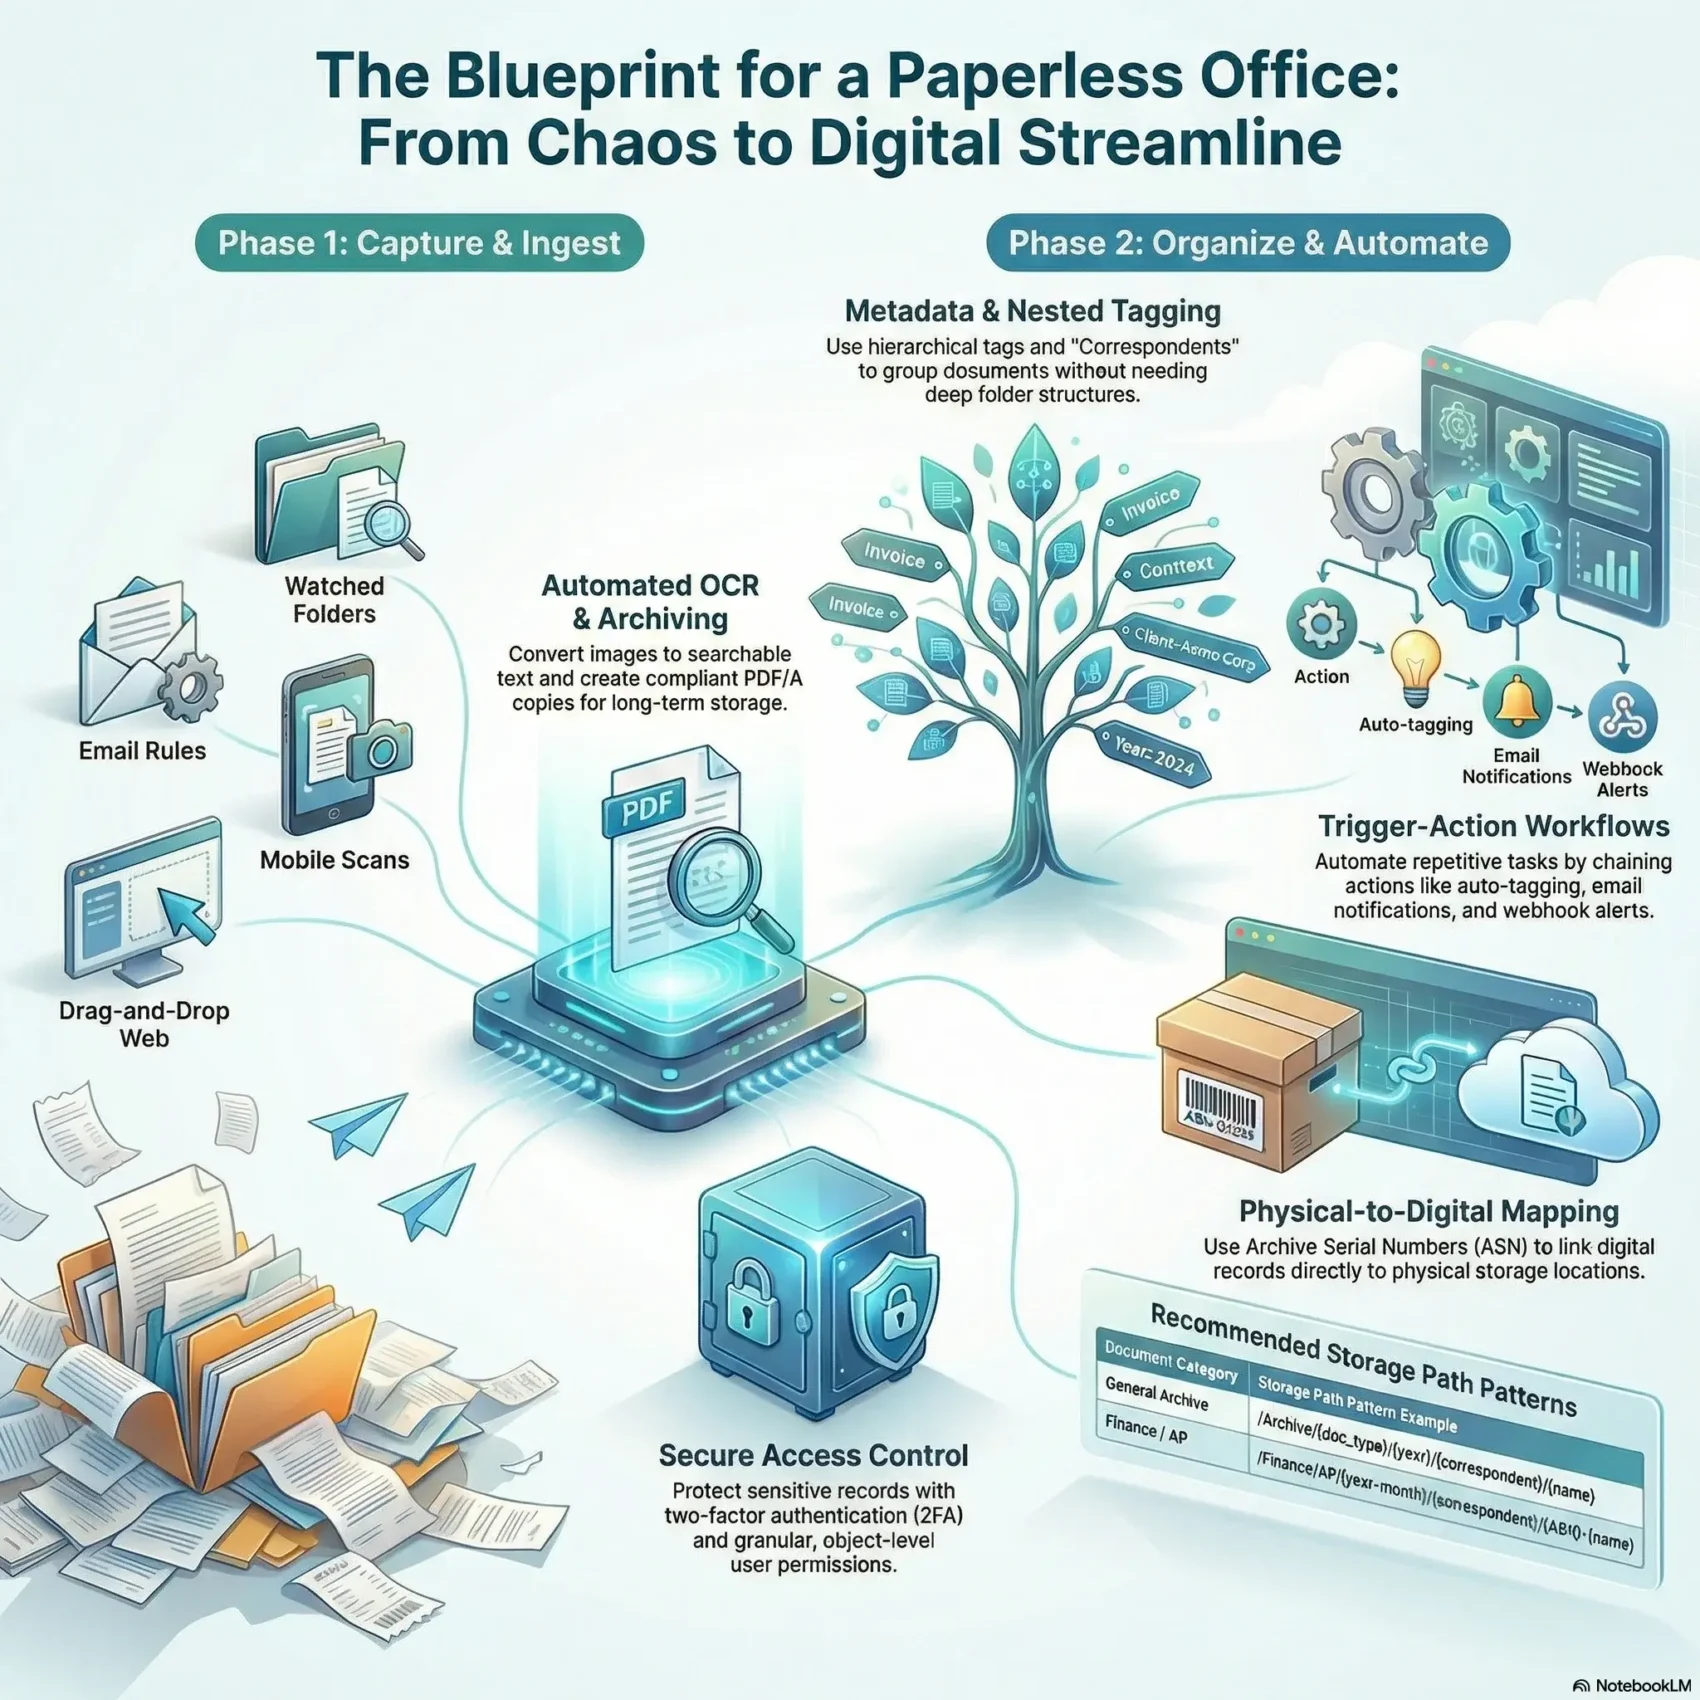
You’ll learn how files are captured from a watched folder, incoming email, or drag-and-drop in a modern web UI. The system runs OCR, creates archival PDF/A copies, and indexes content so you can search instantly.
We focus on easy steps you can copy today. You’ll set up tags, correspondents, and document types so finding documents is simple, not rigid. Permissions and automation help you route invoices, share links, or trigger follow-ups on schedule.
By the end, you’ll have a clear step-by-step path to manage your documents, preserve originals, and scale the approach as your team grows.
Key Takeaways
- Capture files from folders, email, or drag-and-drop.
- OCR and PDF/A archiving make records searchable and compliant.
- Use tags and custom fields to avoid deep folder hunting.
- Plan storage and names early to prevent rework.
- Automate routing and permissions to save time and protect data.
Why Go Fully Digital Right Now
Switching to a digital-first document system puts searchable content at your fingertips, fast. You cut minutes and hours from common tasks by turning paper or scanned pages into indexed files that OCR makes searchable. This reduces clutter and keeps originals preserved in a consistent internal structure.
Time savings and reduced physical storage
Find what you need in seconds. Advanced search and saved views surface documents by title, ASN, date, tags, and correspondents. That reduces the time you spend hunting through cabinets or email.
Digitizing paperwork also lowers storage costs. Originals are archived as PDF/A while the system removes consumed files from watched folders and stores them securely.
Improved data access, security, and audit readiness
Control who sees what. Object-level permissions, immutable “date added,” and full change tracking boost audit readiness. Two-factor authentication and share links with expiry protect sensitive data and speed responses to customers.
“A consistent index and clear permissions mean you can prove chain of custody and find records instantly.”
- Faster retrieval with OCR and saved filters for relevant documents.
- Reduced physical storage needs while preserving originals and archives.
- Stronger audit trails, secure access, and reliable document handling.
Plan Your Paperless System and Storage Paths
Create a simple map before you ingest files. Start by listing core document types you handle—like invoices, bank statements, and contracts—and assign where each will live in your storage structure.
Use tags and nested tags to build hierarchy without extra work. With parent tags applied automatically, you keep organization consistent and reduce manual edits.
Define document types, tags, and storage path strategy
Set storage path patterns that include variables such as date created, correspondent, and document type. That path approach makes retrieval and backups predictable.
Plan a tag strategy early. Nested tags let you group broadly and drill down later while parent-child behavior keeps structure intact.
Standardize file names, dates, and users/groups from day one
Agree on naming conventions and a file name pattern now. A consistent name helps bulk operations, exports, and cross-system links.
Decide how you will use date created versus the immutable date added so reports and retention rules stay accurate.
- Map core document types and a short taxonomy.
- Use correspondents to tag senders for better filters.
- Document naming and user/group roles in a short internal guide.
Set Up Your Paperless-ngx Foundation
First, set up the web interface and a safe ingestion folder so your team can upload documents with confidence.
Web UI basics: dashboard, document list, and saved views
Arrange a dashboard with saved views that surface the documents you care about most.
Use the document list filters to show by tag, correspondent, document type, or date range. Learn bulk edit steps to apply tags and types to many items at once.
Configure the consumption directory and OCR/archival settings
Point the consumer to a watched folder so new files are moved into the media directory and removed from the source folder.
Tune OCR so it runs only when no text is present. For digital-only files, enable PAPERLESS_OCR_SKIP_ARCHIVE_FILE=with_text to skip creating archives.
Decide on storage paths for original and archived files
Define a storage path pattern that keeps originals alongside archives and never overwrites originals. Verify file names and path rules produce the tidy structure you planned.
- Set defaults for owners and permissions aligned with your org chart.
- Create saved views for common queues like “New invoices this month.”
- Ingest a small batch to confirm data stored and paths behave as expected.
Capture Documents the Smart Way
Make ingesting documents painless by consolidating uploads, mail, scanners, and API posts into one place. This reduces manual steps and speeds processing so you can act on items the same day they arrive.
Upload via the web UI and drag-and-drop
Click the dashboard upload or drag anywhere in the web app to add files fast. The consumer triggers on drop and moves consumed files into the media store so your watched folder stays clean.
Incoming email rules and safety
Set mail accounts with per-account rules: filter by folder, sender, age, or filename pattern. Actions include delete, mark as read, move, or add an IMAP tag.
Processed mail tracking uses UID checks to avoid duplicates. If you need to re-process a message, delete its processed UID entry and run the fetch again. Configure mail checks on the schedule you prefer (default: every 10 minutes).
Mobile, scanners, and REST API ingestion
Point scanners to the consumption folder over SMB or FTP so scans drop in automatically. Use compatible mobile apps to push images or PDFs on the go.
For automated systems, POST documents and metadata to the REST API and include fields like tags or correspondent. Note: consumed files are removed from the watched folder and stored inside the system.
- Connect Gmail or Outlook via OAuth2 to avoid storing passwords.
- Use filename patterns to target only the messages you want.
- Test with a small batch, validate results, then scale intake.
For tool recommendations and companion apps that accelerate intake, check a curated list of productivity tools here.
Structure Your Data: Tags, Document Types, and Metadata
Begin with a simple metadata plan that gives each file a purpose and place. Good structure makes search faster and reports more reliable.
Assign tags on intake so items are grouped automatically. Build a parent-child tag tree (up to five levels) so adding a child tag also includes its parents. This keeps grouping consistent over time.
Assign tags and use nested tags for powerful grouping
Use nested tags to capture broad and specific categories. For example, use “Finance > Invoices” so you can filter both the broad group and the specific type.
Use correspondents and custom fields to enrich search
Set correspondents for vendors, banks, or agencies so you can filter by source easily. Add custom fields like invoice number, department, or contract value to make searches precise.
Map ASN to physical storage when needed
Record an archive serial number (ASN) whenever a digital record maps to a binder or shelf. That lets you retrieve a physical copy quickly without guesswork.
“Keep ‘date created’ true to the issued date; use ‘date added’ to track ingestion.”
- Leverage document types (invoice, contract, statement) to drive rules and dashboards.
- Apply bulk edits to normalize tags, types, and fields on older imports.
- Review and prune tags regularly and train every user on the same metadata rules.
Control Access with Users, Groups, and Permissions
Start by mapping who must view, edit, or share each document type in your system. A clear plan reduces mistakes and speeds onboarding.
Global vs. object-level rules in practice
Global permissions control areas like Documents, Tags, and Settings. Grant view, add, edit, or delete rights only where needed.
Object-level permissions limit visibility and edit rights on specific documents, tags, or types. Use these for financial or HR items so only designated people can open them.
Ownership, defaults, and shared access
Objects have an owner who can set permissions and create share links. UI-created items default to the creator as owner.
Items from the consumption directory start without an owner unless you set one via workflows. Define defaults in Settings to avoid accidental exposure.
Protect accounts: 2FA and password reset
Enable TOTP two-factor authentication and require recovery code safekeeping during onboarding. This cuts risk for accounts with broad access.
Configure SMTP (PAPERLESS_EMAIL_HOST) and PAPERLESS_URL so password reset emails reach the right email address and links work from the web UI.
“Organize users into groups that mirror departments to simplify permission reviews.”
- Use groups to inherit permissions and reduce manual settings.
- Apply workflows to set permissions automatically by tag, correspondent, or type.
- Audit memberships and review permissions regularly to maintain least privilege.
Automate your paperless workflow
A few simple triggers can route incoming documents to the right person or queue automatically.
Define when automations run using trigger types like incoming email, scheduled checks, webhooks, or a manual UI button. Each workflow trigger starts a chain of actions so your team wastes less time on repetitive tasks.
Actions you can chain
Chain actions such as emailing a document, creating a share link with expiration, posting a webhook, or requesting an approval. You can also automatically assign tags and set default permissions so new items land in the right queue.
Flow control and sub-flows
Use if/else logic to route by document type, correspondent, amount, or missing custom fields. Insert waits to pause until a due date or reviewer approval. Build reusable sub-flows to standardize common routes across teams.
Practical automation examples
- Trigger on supplier email: OCR, assign tags, set permissions, then email the finance team.
- Daily scheduled check: flag unpaid invoices and post a webhook to your ticketing system.
- Manual UI trigger: start an HR approval flow that waits for manager sign-off.
Start small: test with one trigger type, log every step, then expand. Good logging helps you troubleshoot when a rule doesn’t behave as expected.
Share, Collaborate, and Track Documents
Sharing should be simple and safe. Create a public share link when you need external access without provisioning accounts. Links use the pattern {paperless-url}/share/{slug} and do not require login while active.
Share links with optional expiration for external access
Set an expiration so a link closes automatically after a set time. After expiry or deletion, visitors see the login screen. If you run behind a reverse proxy, you may want to confirm share paths bypass extra auth, but do so with caution.
Email sharing and bulk operations from the document detail
Use the Send button to email a document and capture the recipient’s email address for quick reference. For many files, use bulk operations to share or to update object-level permissions across a selection.
- Create a share link from the document detail for temporary external access.
- Grant view/edit to groups for ongoing collaboration rather than one-off user grants.
- Track shared links in the document detail and revoke access by deleting the link.
- Keep sensitive approvals in your workflows instead of scattered email threads.
- After ingestion, tidy the original mail folder so collaboration stays clear.
“Prefer share links for temporary access and permissions for ongoing collaboration.”
Search, Manage, and Keep Documents Updated
Search is where daily management wins or loses. Use advanced search to query title, ASN, tags, or words found inside a file. OCR content is indexed so you can pinpoint documents by phrase or date in seconds.
Advanced search, OCR content, and bulk edits
Run precise queries against OCR text, file name, or custom fields to surface exact matches. Then apply bulk edits to set tags, correspondents, document type, or custom values across many items at once.
Saved views and alerts to see documents that matter
Save common filters and pin them to your dashboard so you always see documents that matter first. Add alerts or scheduled checks to flag items by date, missing fields, or tag changes.
“Standardize names and dates so reporting and retention stay reliable.”
- Confirm archived PDF/A and originals are both present for compliance.
- Review processed email UIDs and re-process mail when needed.
- Use object-level access to restrict edits while allowing read access broadly.
- Automate routine management steps to keep queues current and data stored clean.
Real-World Examples and Storage Path Templates
Concrete examples make it easy to copy proven intake and storage patterns for your org.
Invoice intake and approval
Example: Trigger on incoming email with filename pattern “invoice*”.
Assign nested tags like Finance > AP and the vendor name. Set the document type to Invoice so rules and saved views match immediately.
If the amount exceeds a threshold, route to a manager for approval. If not, auto-tag as ReadyToPay and notify AP via an email action. Post a webhook with invoice number, vendor, amount, and date to your accounting system to speed entry.
HR onboarding and retention
Restrict sensitive files to users groups for HR only. Tag by Employee and Onboarding, then set retention reminders using saved views.
Use object-level permissions to prevent edits while allowing leadership to see documents when needed. This keeps privacy strong and approvals traceable.
Storage path templates
Choose predictable paths so backups and exports are simple. Try:
- /Archive/{document_type}/{date_created:%Y}/{correspondent}/{name}
- /Finance/AP/{date_created:%Y-%m}/{correspondent}/{ASN}-{name} — ties digital records to physical storage.
Use a “document updated” saved view to review contract changes monthly and capture amendments. Keep examples and screenshots in your internal wiki so teammates can replicate the process fast.
“Start with one example per department, measure time saved, then expand templates and automation coverage.”
For SOPs and productivity examples, see SOPs and productivity examples to document your steps and train new users quickly.
Conclusion
Conclusion
Close with a short checklist to make the system a daily habit for every user. You now have a blueprint to build a paperless workflow that scales from intake to approvals. The paperless system combines a web UI, OCR, PDF/A archives, nested tags, and a consumer that watches folders and mail so files move where they belong.
Use automation to cut repetitive steps and give your team back time. Guard access with granular permissions and two-factor authentication. Share links and saved views keep collaboration fast while preserved originals and archives keep data audit-ready.
Start small, train users on naming and tags, measure results, and expand templates as you grow. This approach makes documents easier to find, safer to share, and simpler to manage over time.