
You can set the tone for a calmer workday by deciding, once, where every item on your desk lives.
Desk organization is not about a minimalist photo. It is about removing the dozens of small decisions that sit between you and the work: where the charger went, which notebook has the meeting notes, whether that stack of paper still matters.
This guide walks through a full reset, from clearing the surface to building zones, taming cables, adding vertical storage and keeping the system alive with a short weekly routine. Every step is designed to survive a normal week, not a perfect one. The desk organization ideas below work on any desk, but most were chosen with a small desk in mind, where every organizer has to earn its place. For the wider room around it, including layout, light, temperature and ergonomics, the broader guide to workspace optimization covers the full picture.
Key Takeaways
- Give every tool a fixed home so you stop making the same small decisions daily.
- Keep only daily-use items on the surface and store the rest within a step or two.
- Use vertical and under-desk storage to gain room without a bigger desk.
- Group related items visually, because scattered objects compete for your attention.
- Run a five-minute weekly reset so clutter never accumulates enough to need a big cleanup.
Why desk organization matters right now for focus and productivity
There is a decent neurological reason a cluttered desk feels tiring. In a study published in the Journal of Neuroscience, Stephanie McMains and Sabine Kastner found that several objects in view at once compete for processing in the visual cortex and suppress each other’s neural response. Directed attention has to work hardest when items are scattered with no visible grouping, and least when they are visually grouped (McMains and Kastner, 2011).
In practical terms: a desk where pens, cables, mugs and paper are jumbled together makes your brain spend effort separating them before you even start. The same items arranged in clear groups cost far less.
That is the whole argument for zoning. You are not tidying for appearance. You are reducing the number of things your attention has to sort through, in the same spirit as the practical steps for combating digital fatigue.
A second benefit is fewer micro-decisions. Every time you pause to think “where does this go”, you spend a small amount of the same mental budget you need for real work. Fixed homes for items remove those pauses, in the same way a set routine reduces the decision fatigue that builds up over a workday.
The physical desk is only half the picture. If your files and desktop icons are equally scattered, the tidy surface will not help much, which is why this pairs well with a clear system for digital files.
Start fresh: clear everything, take inventory, and keep only the essentials
Take everything off the desk. Not “sort through it” but genuinely empty it, including the drawers, onto the floor or a spare table.
This matters because sorting in place lets you keep things by default. An empty desk reverses the burden: each item now has to earn its way back. Most people find the reset takes 45 to 90 minutes the first time and far less afterwards.
Work through the pile once, quickly. Second-guessing every stapler is how a 60-minute reset becomes a lost afternoon, and it is one of the classic traps of spending more time organizing than doing.
Set your keep, toss and backstock rules
Decide the rules before you touch the pile, so you are applying a policy rather than judging each object on its merits.
A simple version that works: if you use it most days, it goes back on the desk. If you use it occasionally, it goes in a drawer. If you have not touched it in six months, it goes to backstock or the bin.
Backstock means the spare stock you genuinely need but rarely reach for: extra printer ink, a second pack of pens, spare adapters. It belongs in labeled containers on a shelf or in a cupboard, available in under a minute but out of sight.
Be honest about duplicates. Four half-used notebooks and eleven pens are not a supply strategy, they are a decision you postponed.
Labeling basics so you always know where things live
Good labels make returns automatic. Without them, the system works for a fortnight and then quietly collapses, because putting something away requires remembering where it belongs.
Use short, specific names. “Cables, USB-C” beats “Tech”. “Notepads, Letter” beats “Paper”. Place labels where your eye naturally lands: the front edge of a box, the top lip of a drawer.
- Keep one font and one label colour so the whole set reads as a single system.
- Label both the container and its shelf position, so a returned box goes back in the right slot.
- Add dates to anything time-limited, such as “Taxes 2025”, which makes the annual purge obvious.
- Keep a labeler or blank cards in the top drawer, because category names change as your work does.
Create smart zones: what stays on top, what goes in drawers, what moves off the desk
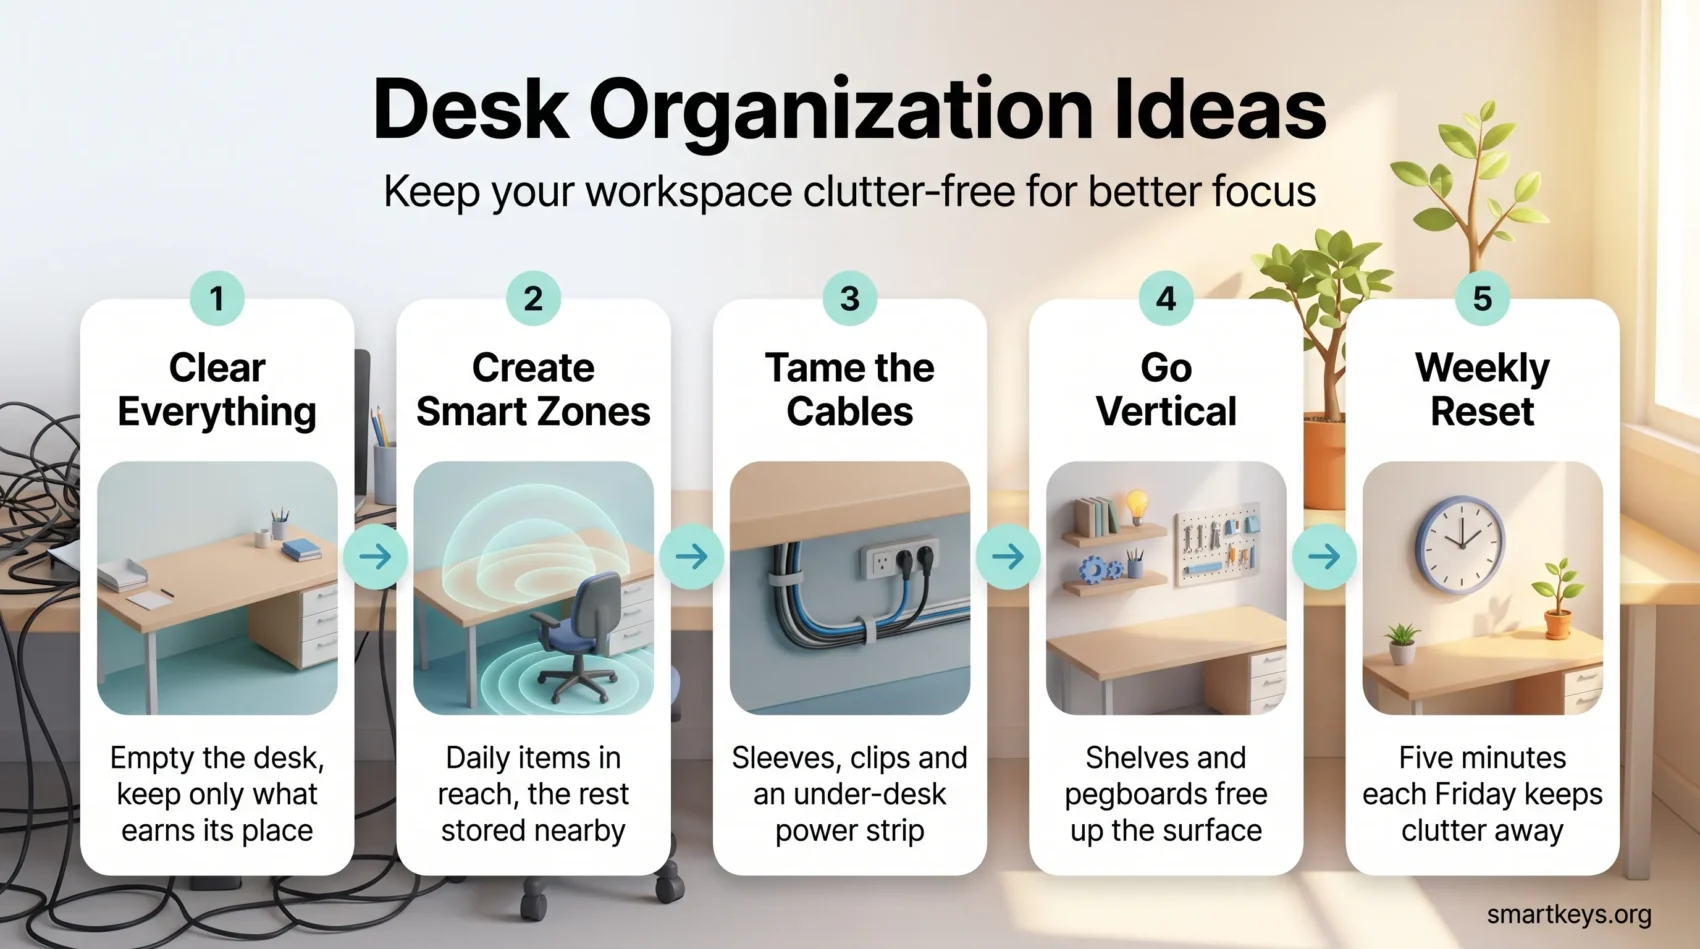
Zoning means grouping items by how often you reach for them, then placing each group at a matching distance. It is the single change that does the most for a small desk.
Think in three rings: the surface for daily items, drawers for weekly items, and shelves or cupboards for everything else.
Daily essentials within arm’s reach
Keep only what you touch every day in the closest ring: one pen, one notebook, your main device, a charging cable, a drink.
Measure this literally. Sit in your chair, put your hands out and see what you can reach without standing. That arc is your prime real estate, and it is smaller than most people assume.
If a second screen is part of your daily setup, treat it as a fixed feature of the zone rather than something to shuffle around, since a second screen changes how you lay out the whole surface.
Backups and bulk items off the surface
Extras go into labeled boxes on a shelf or in a cupboard. If you work in an office with a supply room, use it instead of storing a private cache at your desk.
Give today’s paper exactly one home, such as a single shallow tray, and empty it before you finish for the day. A tray that never empties is just a slower pile.
- Pick the handful of supplies you actually use daily and keep those reachable.
- Move every backup into labeled storage so the surface cannot fill up again.
- Set a monthly check to restock from backstock, so you never raid the desk for a spare.
Tidy tech: cable management that actually sticks
A few mounts turn a tangle of cords into something you never think about again. Start by splitting your gear into two groups: devices you unplug regularly, and devices that stay put for months.
The permanent ones can be routed and fixed underneath the desk. Only the occasional ones need an accessible plug.
Use sleeves, clips, and blocks to corral cords
Bundle the permanent cables into a fabric or neoprene sleeve. One thick line reads as far less visual noise than six thin ones, which is exactly the grouping effect described earlier.
Add adhesive clips along the underside of the desktop to route the lines where you expect them. Keep one clip at the front edge for your phone cable so the end is always in the same place.
Mount power strips and drives beneath the surface
Fix a surge-protected strip under the desktop so all the plugs live in one place and nothing sits on the floor. Adhesive brackets will hold external drives underneath too, which keeps them cool and out of sight.
Run a single lead down to the wall outlet. That one visible cable is the whole floor situation, instead of six.
Before you commit the adhesive, sit down and check knee clearance, and if you use a sit-stand desk, raise and lower it once with everything mounted. Cables that are perfectly tidy at sitting height can pull tight when the desk rises, a detail worth checking alongside the rest of your desk ergonomics.
Elevate your setup: monitor stand, desk shelf, and risers for ergonomic space gains
Raising your screen does two things at once: it fixes your neck angle and it hands you back the space underneath.
A screen should sit so the top of the display is roughly at eye level and you look slightly down at the content. Most monitors on their factory stands sit too low, and most laptops sit far too low.
Monitor stand with drawer vs. desk shelf: which frees more workspace
A monitor stand with a shallow drawer gives you hidden storage for pens, sticky notes and a charging brick. The trade-off is a fixed height and less clearance underneath.
A plain shelf or riser gives more open room beneath for a keyboard, a notebook or a slim tray, and it looks cleaner on video calls. Choose the drawer if your desk has no drawers at all; choose the shelf if you mainly want the space back.
Laptop and tablet stands to stop hunching and reclaim surface area
A laptop stand plus an external keyboard and mouse is the cheapest ergonomic upgrade most people can make. The stand lifts the screen to eye level, and the keyboard lets your arms stay at a sensible height, which a laptop alone cannot do.
The space underneath the stand holds a notebook or a slim tray. Park your phone on a small stand in the same zone so notifications stay visible without the phone wandering across the desk.
If your phone is the thing pulling your attention rather than your desk, the placement will not fix that on its own, and blocking the distracting apps and sites during focus blocks does more.
Drawer peace: dividers, trays, and storage drawers that stop the junk-drawer spiral
A junk drawer forms for one reason: the drawer has no internal structure, so everything that goes in becomes “miscellaneous”.
Modular drawer organizers solve this by turning one large space into several small, single-purpose ones. Measure the interior before you buy, because a divider set that slides around every time you open the drawer recreates the problem it was meant to fix.
Give each compartment exactly one job: paper clips, sticky notes, spare cables, writing tools. The moment a compartment holds two unrelated categories, it starts becoming a junk drawer again.
- Measure interior depth and width first, then buy dividers that fit snugly.
- Keep everyday tools in the top drawer and rarely used items lower down.
- Label the inside lip so returns are quick and correct.
- Leave a little empty space, so the drawer closes smoothly and you have room to grow.
Stackable paper trays do the same job for documents. A shallow tray for today’s paperwork keeps anything urgent visible, and it clears during the weekly reset described later.
Desktop organizers for pens, files, and small supplies
Small items are the ones that spread. A compact set of holders stops pens, clips and notes from colonising the whole surface.
Use a desktop organizer set for pens, sticky notes, and small items
Pick a set with distinct compartments rather than one open tub. A shallow tray for sticky notes, a narrow slot for the pen you actually use, and a small cup for clips is usually enough.
Resist buying a large organizer “for the future”. Extra capacity fills itself.
Pencil holder and file holder picks that fit your workflow
Choose a pen holder with a weighted or wide base so it does not tip when you reach across it. For paper, a vertical file holder keeps active folders upright and readable at a glance, which a horizontal stack never manages.
Placement and simple habits that make the system stick
Put holders on your non-mouse side. The mouse arc needs to stay clear, and anything in it will be nudged aside a hundred times a week until it ends up somewhere random.
Keep a single cup for clips. Two cups means clips live in both, and soon in neither.
- Use one cup for clips and one slot for pens, then stick to it.
- Keep active folders in a labeled vertical holder, not a flat pile.
- Review the file holder weekly so finished projects move off the desk.
No-drawer desk solutions: hidden storage, under-desk trays, and rolling carts
Plenty of desks have no drawers at all. Closed boxes, an under-desk tray and a slim rolling cart can replace them entirely, and a cart has one advantage a drawer does not: you can move it out of the way.
Conceal clutter with labeled boxes and minimalist containers
Choose boxes that close fully. An open basket shows its contents, which puts the visual noise straight back on the desk.
Label the front edge so you can identify a box without lifting the lid. Keep the lids and colours consistent, because a shelf of matching boxes reads as one object rather than five.
- Pick sturdy containers that close, hide their contents and stack safely.
- Store rarely used items higher up and daily items at desk height.
- Use the rolling cart for the project you are currently on, then clear it when the project ends.
Go vertical: shelves, pegboards, and wall organization to free your desktop
The wall above a desk is usually the most underused storage in the room. Moving binders, reference material and decor up there gives the surface back without buying a bigger desk.
Floating shelves for binders, magazines, and decor
Floating shelves keep bulky items visible but off the work surface. A deeper shelf suits binders; a shallow one suits magazines and framed photos.
Mount the lowest shelf high enough that you can sit upright without ducking, and check the fixings match your wall type. A shelf you distrust is a shelf you will not load.
Modular pegboards and paper tray systems for flexible storage
A pegboard is worth it when your needs change often. Cups, hooks and small trays can be moved in seconds, so the layout follows the project rather than the other way round.
Wall-mounted paper trays labeled “In”, “Waiting” and “Archive” give paper a single direction of travel. Anything in “Waiting” that has not moved in a month probably belongs in “Archive” or the recycling.
External support: filing cabinets, bookcases, and office storage that work hard
Once the desk itself is clear, the question becomes where the rest of it lives. External units handle the volume that a desk was never meant to hold.
A compact filing cabinet covers active files and archives. Label each drawer by category rather than by year, unless the category genuinely is a year.
Put a vertical file holder on top for today’s work, so current documents stay visible while deeper storage sits below. A bookcase does the same job for reference material, boxes and gear that should not live at eye level.
Position all of it within a step or two of the chair. Storage that requires a walk to another room gets used for archives only, which is fine, as long as that is what you put in it.
Digitize to minimize: scanning, shredding, and smarter printing
Most of the paper on a desk does not need to be paper. Receipts, warranties, bills and statements can be scanned in seconds with a phone and then disposed of properly.

Scan-and-store routines for receipts and files
The habit worth building is “scan once, touch the paper once”. Capture it, file the PDF, deal with the original immediately rather than putting it in a pile to handle later.
Name files so they sort themselves. A format like 2026-09-electricity-bill.pdf puts everything in date order automatically and removes any need to remember what you called things. Once that habit is in place, the natural next step is moving the rest of your workflow fully digital, and keeping the files themselves ordered with a proper digital declutter.
Shred originals you no longer need, and keep only what tax or legal rules in your country actually require. Retention periods vary, so check your local rules rather than guessing.
Hide a compact wireless printer
A printer is usually the largest object competing for desk space, and most people use one a few times a month. A compact wireless model fits in a cupboard or a deep drawer.
Before you commit, measure the space and check two things: ventilation and a power outlet. A printer in a sealed cupboard with no airflow is a bad idea.
Small spaces, big gains: multi-use nooks, modular organizers, and stackable options
When the desk doubles as a dining table or sits in a bedroom, the organizing problem changes. You are not designing one layout, you are designing a transition between two.
Pick pieces that work in both modes. A single lamp, one small tray and a slim organizer can look at home as a bedside setup and as a work surface, which a full desktop organizer set cannot.
Keep the work items in one container you can lift away in a single movement. A shallow box with your notebook, pen and charger converts the desk in about ten seconds.
Run two short resets rather than one: clear work items at the end of the workday, clear personal items in the morning. That boundary matters more in a shared space than in a dedicated office, and it is one of the more reliable remote work habits for keeping work and home separate.
Style with purpose: materials, colors, and personal touches
A functional desk does not have to look clinical. A few chosen pieces make the difference between a workspace you tolerate and one you want to sit at.
Mix materials deliberately. Pick one dominant material, such as wood, and use metal or acrylic as accents. Three or more competing materials start to read as clutter even when everything is tidy.

Colour works the same way. Organizers in one or two tones that echo the room let the desk read as a single calm zone instead of a collection of separate objects.
Personal touches that do not crowd the surface
Let function lead. A small frame, a low-maintenance plant or a nice mug all earn their place. A collection of twelve small ornaments does not.
Put photos and plants on a riser or shelf rather than the work surface, so the personality is visible but the desk stays clear. A lightweight throw over the chair is worth more than another desktop object if you tend to get cold.
Keep scent minimal. Strong fragrances are more distracting than most people expect, and there is no way to turn one down once the room has it.
Light it right: move lighting off the desktop and use natural light
Lighting is the one upgrade that makes a tidy desk feel genuinely better to work at, and the goal is to get the light source off the surface entirely.
A floor lamp with an arc or boom arm puts light over your work from above without occupying any desk space. It also gives you a brighter, more even pool of light than a small desk lamp can.
Position yourself so daylight comes from the side rather than behind or directly in front of the screen. Light behind you creates screen glare; light in front of you creates silhouette problems on video calls.
Choose bulbs you can dim, and warmer tones for late sessions. Details like colour temperature and glare have a measurable effect on eye strain, covered properly in our guide to optimizing workspace lighting for focus.
Power made neat: wireless charging and a designated charging zone
Give charging one location and the cables stop wandering. Without a fixed spot, chargers migrate to wherever you last sat, which is how you end up owning six and never finding one.
Set up a small area, on a shelf or the corner of the desk, for phones, earbuds and anything else that needs regular power. A shallow tray next to it holds plugs, tips and spare leads.
Wireless pads help here because there is no cable end to lose. Where you do need cables, two clips at the desk edge keep the ends in the same place every time.
Bundle the leads you rarely use with a tie and put them in one labeled pouch. Loose spare cables are the single most common source of drawer chaos.
For the digital equivalent of the same problem, see how to declutter your digital workspace.
Keep it that way: five-minute Friday resets and monthly audits
Every organizing system decays. The only question is how fast you catch it. A five-minute reset at the end of the week is enough to stop clutter from reaching the point where it needs a whole afternoon.

Attaching the reset to something you already do on Fridays makes it far more likely to happen, which is the basic mechanism behind habit stacking. It also fits naturally into a weekly review if you already run one.
The five-minute version
Clear the surface back to its daily items, empty the paper tray, return anything that has drifted, and wipe the desk. That is the whole routine.
The monthly version
Once a month, go a level deeper. Relabel any category whose name no longer matches what is inside it. Rotate supplies so the top drawer holds only current items. Clear duplicates and anything expired.
Most usefully, note the friction points. If the same object ends up in the wrong place every week, the object does not have the right home yet. Move it rather than repeatedly tidying it.
Conclusion
A well-organized desk is a set of decisions you have already made. Daily items within reach, weekly items in drawers, everything else stored nearby and labeled well enough that returning things is automatic.
The mechanics are simple: clear the surface completely, decide what earns its way back, group what remains, and move the bulk to vertical or external storage. Digitize the paper, give charging one home and keep the lighting off the desktop.
Then protect it with five minutes on a Friday. That is the part that makes the difference between a desk that looks good for a month and one that still works a year from now, and it pairs well with the wider habits in our guide to building a productive home office environment and the focus practices behind deep work.
Found this useful?
Make SmartKeys a preferred source on Google, and our articles will surface more often in your Top Stories, AI Overviews, and AI Mode.
Add as Preferred SourceFAQ
What is the first step to clearing a cluttered desk?
Empty the desk completely, including the drawers, before you sort anything. Sorting in place lets you keep items by default, because you only remove what obviously bothers you. Starting from an empty surface reverses that: every item now has to justify going back. Work through the pile in one pass using simple rules rather than judging each object individually, so you decide quickly. Daily-use items return to the surface, occasional items go in drawers, and anything untouched for six months goes to backstock or the bin. Expect the first full reset to take roughly an hour. Later resets take a fraction of that because most of the decisions are already made.
How do I set keep, toss and backstock rules that actually work?
Write the rules before you start sorting, so you are applying a policy instead of weighing up each object. One-line rules work best: used most days means keep on the desk, used occasionally means drawer, duplicates mean backstock, and unused for six months means toss. Backstock is the spare supply you genuinely need but rarely reach for, such as extra ink or a second pack of pens. It belongs in labeled containers on a shelf, reachable in under a minute but out of sight. The rules matter more than the containers. Without them you end up re-deciding the same items every few weeks, which is exactly the friction good organization is meant to remove.
What should stay on the desk surface and what should go into storage?
Keep only what you touch every day within arm’s reach: one pen, one notebook, your main device, a charging cable and a drink. Test this literally by sitting in your chair and reaching out. The arc you can cover without standing is smaller than most people assume, and it is the space worth protecting. Weekly items belong in drawers, and everything else belongs on a shelf or in a cupboard within a step or two. Today’s paper should have exactly one home, such as a single shallow tray that you empty before you finish for the day. A tray that never empties has simply become a slower version of a pile.
How do I manage cables without a tangle under the desk?
Split your cables into two groups first: the ones that stay plugged in for months and the ones you unplug regularly. Bundle the permanent ones into a fabric sleeve, because one thick line creates far less visual noise than six thin ones. Route them along the underside of the desktop with adhesive clips, and mount a surge-protected power strip underneath so all the plugs live in one place. Run a single lead down to the wall outlet. Keep one clip at the front edge for the cable you use daily, so the end is always in the same spot. If you have a sit-stand desk, raise and lower it once after mounting to check nothing pulls tight.
Should I buy a monitor stand with a drawer or a plain desk shelf?
It depends on whether your desk already has drawers. A monitor stand with a shallow drawer gives you hidden storage for pens, sticky notes and a charging brick, which matters most on a desk with no drawers at all. The trade-offs are a fixed height and less clearance underneath. A plain shelf or riser leaves more open room beneath for a keyboard, notebook or slim tray, and it usually looks cleaner on video calls. Either way, the ergonomic goal is the same: the top of the screen roughly at eye level so you look slightly down at the content. Most monitors on their factory stands, and nearly all laptops, sit too low.
How do I stop a drawer from turning into a junk drawer?
A junk drawer forms because the drawer has no internal structure, so anything that goes in becomes miscellaneous by default. Modular dividers fix this by turning one large space into several small, single-purpose ones. Measure the interior depth and width before buying, because a divider set that slides around every time you open the drawer recreates the problem. Give each compartment exactly one job: clips, sticky notes, spare cables, writing tools. The moment a compartment holds two unrelated categories, it starts to become a junk drawer again. Label the inside lip so returns are quick, and leave a little empty space so the drawer closes smoothly and has room to grow.
What are the best storage options for a desk with no drawers?
Closed boxes, an under-desk tray and a slim rolling cart can replace drawers entirely, and the cart has one advantage a drawer does not: you can move it out of the way. Choose containers that close fully, because an open basket puts its contents straight back into your visual field. Label the front edge so you can identify a box without lifting the lid, and keep lids and colours consistent so a shelf of boxes reads as one object rather than five separate ones. Store rarely used items higher up and daily items at desk height. Use the rolling cart for whatever project you are currently on, then clear it when the project ends.
How often should I reset and audit my desk to keep it tidy?
Run a five-minute reset at the end of each week and a deeper audit once a month. The weekly version is deliberately short: clear the surface back to its daily items, empty the paper tray, return anything that has drifted and wipe the desk. Attaching it to something you already do on Fridays makes it far more likely to happen. The monthly audit goes a level deeper. Relabel categories whose names no longer match their contents, rotate supplies so the top drawer holds only current items, and clear duplicates. Most usefully, note the friction points. If the same object lands in the wrong place every week, it does not have the right home yet.